Steam engine project.
I
started this project a long time ago. I had moved to HK and was bored
in the evenings. I had built a few steam engines back in Ireland, so
was interested in building another engine. This is my diary about building the steam launch.
27/11/09 Got two quotes for the brass fittings for the boiler. Had sent quotes to 3 workshops in HK, with workshops in China. Thought they would be cheap, but was wrong, 3600HKD for the fittings for 2 boilers. I was quoted 4100HKD for a lathe. The brass would only cost less than 100HKD. So will not go with them. Awaiting two further quotes, so looking at the moment it would be cheaper to buy my own lathe and make myself.
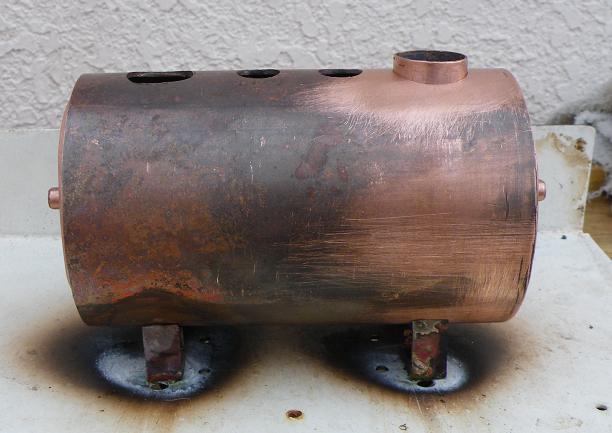
28/11/09 Well today started the boiler. Got the tube cut to the right length and pilot drilled the holes for the fittings. Also cut out the end pieces and pilot drilled the flue holes, stay bar holes and fitting holes. The cutters I used was great, they have serrations on the sheers that prevent the cutters slipping when cutting, so easy to cut with.
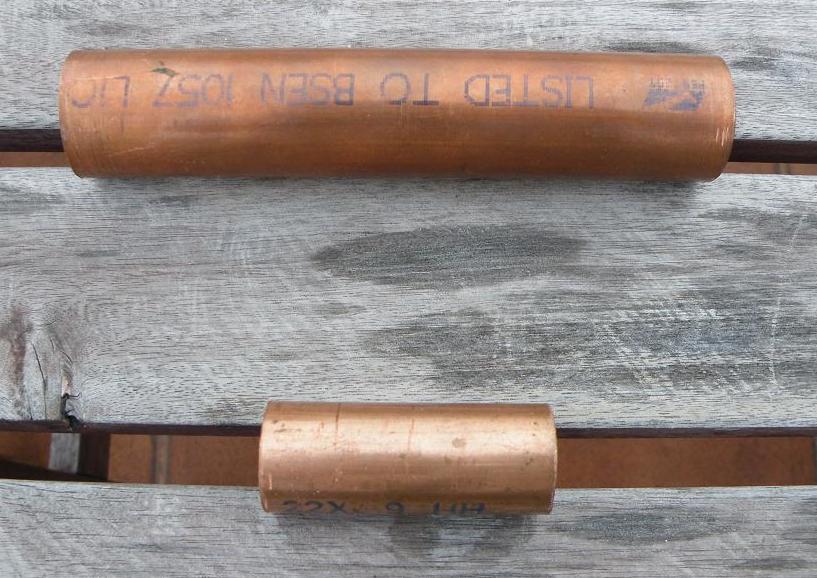
29/11/09 Did some small work today. Cut the two pieces of copper pipe for the flues. Also made a form for the boiler ends from a piece of timber.
30/11/09 Tried to get a quote for the SIEG Nano lathe from the agent in HK. Did not seem to be interested in selling the lathe, so sent an e-mail to SIEG to see if they would sell me direct.
SIEG came back and I purchased the lathe direct from the along with the milling attachment. Luckily I asked about the milling attachment, from the website, I got the impression that it was all included. Cost an extra 50USD. I am awaiting confirmation of the completion of the order and the airway bill number so I can track it. The lead time is 15 days, so hopefully will be here for Christmas. Would make a nice Christmas present.
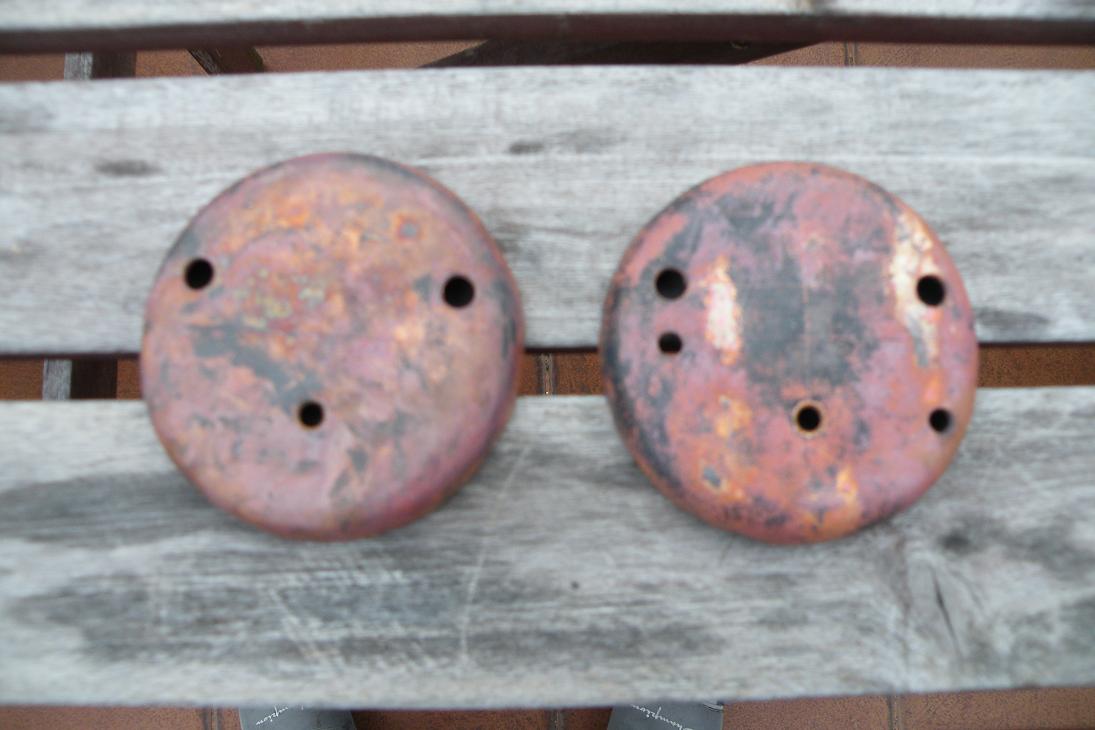
5/12/09 Worked on completing the end caps for the boiler. Had to anneal the copper several time, so the copper could be worked. The form for the end caps worked well. The only change I would make would be to have a smaller radius on the form. Also move the holes for the stays, water gauge and check valve. The holes at the moment are very close to the radius on the end cap. I thick I can get away with time time, but for the next boiler, I will modify the holes positions.
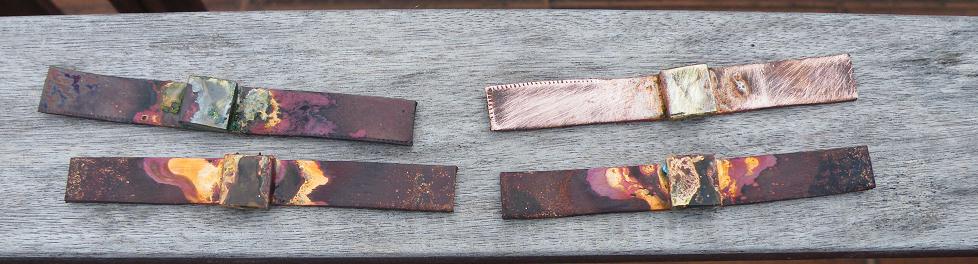
6/12/09 Cut four strips of copper to make the legs. Also cut four brass plates, these will be the nuts for the legs to be bolted to the base.
Brazed the copper plates to the copper strips for the legs.
 Drilled
the center flue for the vertical flue. Then silver soldered the flues
together. The silver solder was OK, I need some more practice with
the brazing before brazing the boiler.
Drilled
the center flue for the vertical flue. Then silver soldered the flues
together. The silver solder was OK, I need some more practice with
the brazing before brazing the boiler.
23/12/09. Received the lathe today. Was a bit disappointed when I first seen the box. It looked very small box. But its a small lathe that I wanted, so cannot complain.
Setup the lathe and got it running. Had to tighten a few bolts, as they were loose. The lathe does not have much power at low speeds, so will have to do most of the machining at the higher speeds.
After machining a few parts, I am happy with the lathe. Due to the size of the lathe, some of the components will be trickey to manufacture, but this will add to the challenge.
Had looked for a small tool bar for inserts for the lathe. But they were very costly, 200HKD compared to 6HKD for HSS. I went for the option of the HSS. Could only get 1/4inch HSS square lengths, but the lathe was only made for 6mm. So had to use a small grinding bur to make the tool bar slot bigger. Sharpened two pieces of HSS. Took a while to get the the hang of grinding cutting tools, but got the bar sharpened.
Was going to form the holes for the center flue, to make a better braze joint. Was going to use some steel that I got at work to make a form tool, but its was too hard, must have been a hardened steel. So got some aluminum instead, but when looked again at the end plates, I reckoned at if I tried to form the hole, it would leave a very small space between the outer wall and the form for the central flue. So decided to drill a straight 22mm instead. Had looked at other boiler design and they did not form the hole for the center flue, so it will be OK. I was probably going to over engineer the boiler.
Got the lathe out and stared to machine some of the fittings. One day machined two of the dia 10mm bushes. One was for the safety valve, but later decided to use a larger bush. The thread for the safety valve was only 6mm, thought this made the threaded part weak. So decided to change it to 8mm thread.
Manufactured a few of the larger bushes. Also worked on the steam dome. The biggest problem was to machine the internal diameter. I had a 1/2inch drill bit, the local hardware store only had imperial sizes. This diameter is not critical, so the 1/2in bit is OK. So how to drill the hole? The lathe did not come with a tail stock drill chuck and the one I got for it is only up to 4mm. So looked at the tail stock. By removing the slide in the tail stock and fitting a bush to the drill bit, then I could drill the internal dia. I would have to slide the tail stock along the lathe bed, not perfect as the tail stock is loose on the bed, but is goo enough for this job. Might look at designing an attachment in the future to drill using a large dia drill.
Since I am in the Philippines on holidays, I cannot work on the physical parts of the boiler, so will do some design work to complete the engine design. Now that I have the lathe, I can design the components the way I want, I do not have to design to make simple for someone to manufacture for me.
Back in HK for a while. Was looking on the internet for some fine taps and dies, but founf it hard to find any. But one day found a site for a shop in HK Kowloon, so got the prices by e-mail, set my order and collected the taps and dies. Need a few more and some reamers, so will go there again. Did not get a chance to do much work on the boiler. Tried to braze the feet to the boiler, but it would not braze. The large copper tube did not seen to be getting hot enough. There was a cold breeze, so that might have been keeping the temp too low. So will try again, but might wait until night, so can see the copper glow in the dark, so I know the temp is correct.
 Got
around to getting some work done. Set about cleaning the boiler to
get ready for brazing. Took some time to get the ends in place. The
large radius on the ends leaves a big gap to braze. Would look better
with a smaller rad. Well that's for the next project.
Got
around to getting some work done. Set about cleaning the boiler to
get ready for brazing. Took some time to get the ends in place. The
large radius on the ends leaves a big gap to braze. Would look better
with a smaller rad. Well that's for the next project.
Still working on the design of the engine. Getting there, finally sorted out a few design problems that I had, well not really design problems, just that I could not make my mind up on which design to go with.
7/3/10 Did more work on the boiler. Finished off some of the brass bush fittings. Need to modify a drill bit for the steam dome. I have got a cheap drill bit that I hope to modify to drill the holes and flats for the bushes.
20/3/10. Was not able to get any work done for a while due to the weather. So the weather was good today, so was able to do some work. Set out to modify the drill bit to machine the flats for the steam dome. I had intended to machine the drill bit on the lathe, but the drill bit was too hard. Then tried to use a grinding bur on the drill. Was not able to get a flat end on the drill bit. So setup a cutting disc on the lathe. This worked, but the sharpness of the cutting edges were not the best. So when went to machine the flats, was not getting a good cut. So polished the cutting edges with a stone. This gave a better cut, but due to the length of the bit was causing chattering. So setup the cutting disc again to cut the drill bit back to the end of the flutes. Just cut in around 3 mm when the disc center broke. So was stuck. I did not have big washers to hold the disc. So got a brainwave. Closed the jaws of the chuck and placed the disc on the jaws. Tightened the chuck on the disc and it held. So turned on the lathe and it spun straight. I then cut the drill bit back just at the beginning of flutes. Then used the disc again to sharpen the drill bit. Then used the hone stone again to get a better cutting edge. I setup the steam dome again. This time the cutting was better, no vibration, but still need some force to cut. So was able to cut all 3 faces.
21/3/10 Simple machining today. Machined the 3 bushes for the steam dome. Would be an easy job, but since I did not have a proper drill chuck for the tailstock, it was difficult. Had to hold the drill chuck in my hand, using the drill check to stop it rotating. It worked, but when the drill dug into the brass, it stopped the lathe. So took several attempts to drill to the required depth. So got the 3 bushed completed. Then made a new bush for the sight gauge, as made the first one with a M10 thread instead of M8 thread.
Later that evening, when it was dark, setup and brazed the 3 bushes to the dome. The darkness helped as could see the brass turn red. Then knew it was hot enough to braze. The braze ran well and was happy with the results. But I had made a mistake. I had started the thread in the bushes, but had brazed one bush with the threads facing inwards instead of outwards. So decided to just tap from the outside and see how close to the original thread I can get. If that does not work, just will have to remove the bush, make a new one and braze it on correctly.
27/03/10 The bush problem worked itself out. I started the tap from the outside and it aligned the threads good enough. I drilled the hole straight through and taped straight through.
 So
cleaned up all the boiler in preparation for brazing. So set about
brazing the boiler. All went well at the start, brazed the two brass
bushes, brazed one of the copper stays and then tried to braze the
second copper stay. But my luck ran out, it just would not braze. So
stopped brazing. Had a think on what went wrong, when brazing, the
copper did not glow a cheery red during brazing, as the copper tube
seemed to be a large heat sink and kept the area to be brazed from
reaching the required temp.
So
cleaned up all the boiler in preparation for brazing. So set about
brazing the boiler. All went well at the start, brazed the two brass
bushes, brazed one of the copper stays and then tried to braze the
second copper stay. But my luck ran out, it just would not braze. So
stopped brazing. Had a think on what went wrong, when brazing, the
copper did not glow a cheery red during brazing, as the copper tube
seemed to be a large heat sink and kept the area to be brazed from
reaching the required temp.
So had to pre-heat the boiler prior to brazing, the pre-heating will prevent the heat sink problem, as the brazing torch will not have to input too much heat.
Also decide to abandon the idea of brazing the boiler in all one go, just do it in stages.
28/03/10. So how to pre-heat the boiler? First thought was to use the BBQ grill, but it would be a dirty option. Then I though about the gas cooker, either buy a small gas burner or use the cooker in the kitchen. So asked my wife if it was OK to use the cooker and surprise she said yes.
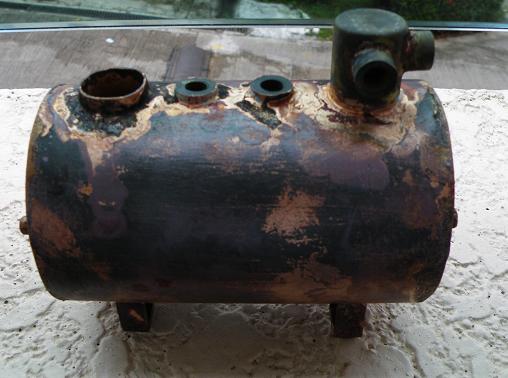
So cleaned the boiler end cap again. This time, since I was going to pre-heat the boiler, it was best to apply the braze flux to prevent the copper oxidizing during the pre-heat. So mixed the flux and applied. Placed the boiler end up on the largest ring and lit the ring. It heated fairly quickly, so lit the gas torch and started to heat the boiler for brazing. Once the copper was hot enough, the silver solder flowed like a dream. So put plenty of silver solder on to ensure the area was sealed. The torch quit a few times, which was frustrating, but the boiler was still brazing, so was happy. So, cleaned the other end of the boiler and brazed that end later, this brazed better than the other end. Just need to braze the legs and the brass fitting on the top.
Also must say, that using the brazing flux was an advantage, it cleaned the copper well for brazing and prevented any oxidization prior to brazing.
2/4/2010. Today set about to continue to braze the boiler. Started by brazing the legs to the boiler. Removed the legs from the plate that I was using before. It would be difficult to use the plate, as going to pre-heat on the gas burner again. So used two bars, that was already pre-drilled to the correct dimensions. So prepared the boiler by cleaning the area around the legs and placing the braze flux on the areas. Placed the legs on the boiler and set the position of the legs. Then lit the stove and waited to heat up, then lit the torch and proceeded to braze the legs. When went to braze the first leg, the rod stuck to the leg and moved the position of the leg, so had to reposition the leg, hopefully in the correct position. Kept going and the silver solder flowed well around the legs.
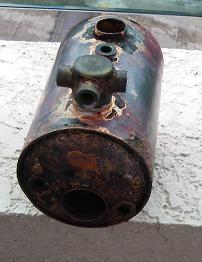
Later after the boiler cooled down, cleaned to boiler around the flue tube. Got the brass bushes for the safety valve and water level. Also got the end cap for the flue ready. Prepared the boiler again with the flux. Place all the parts onto the boiler and lit the burner. The area I was worried about was the flue, so added extra flux when the first flux dried up. So started to braze again. The silver solder flowed around the flue tube, much to my relief. So onto the bushes, the silver solder just flashed around these. Next the steam dome, this took some extra heating as the dome took time to reach temp. But once it was hot enough, the silver solder flowed around it easily enough. Then onto the flue end cap, this brazed easily as it was already hot in the area.
 So
now the boiler is all brazed, so now need to pressure test it. Have
to build a pump or even find a pump that will do.
So
now the boiler is all brazed, so now need to pressure test it. Have
to build a pump or even find a pump that will do.
3/4/2010. Polished the boiler a bit, needs a lot of work to remove all the oxides. Also there is some silver solder that ran, so need to remove this also. But no need to be perfect, as will paint the boiler with black paint. Also will clad the boiler in wood.
So machined two plugs to plug the boiler for the pressure test. The plugs will later be used to make part for the water gauge, but should make the water gauge now and pressure test it along with the boiler.
Modified the pressure gauge I had, by re-threading the boss. This will be used for the pressure test.
Was thinking about the water pump. A tradition pump would have a crank and I did not want go that route, as it could take power from the engine. So was think and remembered a chainsaw oil pump design that uses a rotary cam to pump oil. It did not have valves, used the rotation of the piston and machined flats to work as valves. But not sure if the flats would be good enough to pump under pressure. So will probably use valves. So need to work on the design.
6/4/2010. Finally came to finalize the pump design. I used a wobble plate design. Though about the chainsaw pump, but decided against it, as not sure that the pump would be able to pump enough pressure to fill the boiler.
Just now need to figure out now to connect the pump to the engine.
17/4/2010. Working on the boiler. Polished to boiler to remove all the oxides. When cleaning, seen a lack of braze around the flue. So had to setup and braze again.
Cut some timber for the lagging, but the lats were too big. So will have to look at making them smaller.
14/6/2010. Its been a while since writing here, been busy with designing the pump, which turned out to be a big headache. Came up with several designs, all were good, but problem was to get the right scale. Each pump was workable, but not small enough for the scale of the engine and boat.
26/6/2010. Still have not fully completed the pump design, decided to take a break from the pump and work on the burner and gas regulator.
Came up with a simple design for the gas regulator by using a plastic tube and a pinching valve to restrict the flow of the gas.
5/7/2010. Have moved the lathe into the small room beside the kitchen. Modified my crate into a locker. I have the lathe and some tools in it. The area is a bit cramped, but its fine.
Worked on the boiler fittings. Working on the water gauge. I need to sort out a holder for the dies and taps. I think I have some steel that I can make a die holder, the tap holder might be a bit more difficult, but will think of something.
26/7/2010. Have made a the remaining boiler fittings. Just need braze the water gauge together.
The attempt at brazing the water gauge was a bit of a failure, ran out of gas half way through. Have got another cylinder of gas, so will start again.
31/07/2010. Started on the pressure test pump. Not sure how big to make the pump and if the theory of one large cylinder will be able to pressure test in one stroke.
6/8/2010. Basically have the power plant design completed. Just going back over the components that I have not completed the dimensioning on.
Once I have completed the drawing, I will move onto the boat.
Been machining away on my small lathe. Have all the components made for the boiler. Now working on the pressure test ram.
7/08/2010. Made a few parts today, mainly the check valve for the boiler. Did not finish the check valve, as need a tap for the olive nut.
But the M6 threads were loose in the taped bushed. So looked at making the die open more. But could not open more, due to the die outer diameter, so reduced the diameter of the die. Did a test thread and the results were better, but heard a click, the die has split. The die was still usable, as long as it sat properly in the die holder, did a test thread and the threads looked fine. So went an made a bush for the water tank. But while tapping the bush, noticed that the tap did not run true, so this might be the cause of the loose threads.
21 August 2010. Tried to machine the stainless steel fitting to see if I could us them to build the burner, but the HSS cutter was not cutting, the cutting edge was getting blunted quickly. So need to get either a cemented carbide cutter or solid carbide cutter.
22 August 2010. Was working on a drilling jig to drill the holes in the gas burner. Cut a piece of al block, set it up on the top slide to drill. Drilling it on the lathe will ensure that the center line of the burner tube will be on the CL of the drill. Drilled the hole to locate the SS burner tube. Then was drilling the hole for a bolt to use to lock the tube in position. Was sliding the cross slide along the lathe shaft, though I was clever, not using the slide, but when the drill broke through, the slide moved quickly and crashed into the chuck. This stopped the chuck, breaking the drive belt. So now the lathe is out of commission. Need to go into Mong Kok to see if I can get a new belt.
2 September 2010. Went to Mong Kok today. Got 2 belts. Was easy enough, showed the guy the belt, he measured it, told me the one he had was on tooted on one side, so looked at it, asked price, 21HKD, so got 2.
Then went and got some brass, just enough to keep me going for a while and finish the boiler.
Then went looking for some copper tube. Went to one shop, found a short piece of piping in a wast bin, asked for a price, they guy looked at me and spent a few minutes looking at the pipe and typing on the computer. Asked him the diameter of the pipe, he kind got annoyed and found a measuring tape. I was starting to get annoyed myself, it was a hot day and I was sweating. He the printed out a invoice and was charging me 71HKD. Feck, it was in the waste bin, so why so much, so I told him too expensive and left.
4 September 2010. Tried the belt, it was tight, checked the length against the old one and it was about 5mm shorter. But there was not enough adjustment up of the motor to compensate for the shorter belt. So looked at lengthening the adjustment slots, but could not move the motor up, as the control box above it blocked it from going any higher.
6 September 2010. Decided to start on the boat. Have the power plant drawn, so will use it to get the hull the right size.
11 September 2010. Was working on the boat hull when noticed that the hull was the wrong shape. The powerplant base was bigger than the hull width drawn, so the design of the hull was wrong. Made a few attempts to correct the problem, but decided to start again from scratch, than wasting time to correct the problem.
12 September 2010. Did some machining today. Found the brass tube I got a long time ago. I used it as the body of the oiler. But is was a different size, so tweaked the design dimensionally. So made all the parts. Made the connecting tube between the oiler body and the tube connector larger that the design, I will re-draw the design to the new dimensions.
Silver soldered all the parts together. But the plate the oiler was resting on was brazed during the brazing, so had to light the gas again and break the joint. Let it all cool down. Then cleaned it up. It looks good, so I am happy with the results, just need to fully clean it up.
18 September 2010. Made the nuts and bolt holders for the bands. Made a neat holder for drilling the holes. Machined a slot in a block of aluminium, then used it as a holder for drilling the holes in the round bar. It gave me an idea to make an attachment for drilling round bars. Actually will need to make a drill chuck holder for the tail stock. I will need to drill accurately when drilling for reaming holes.
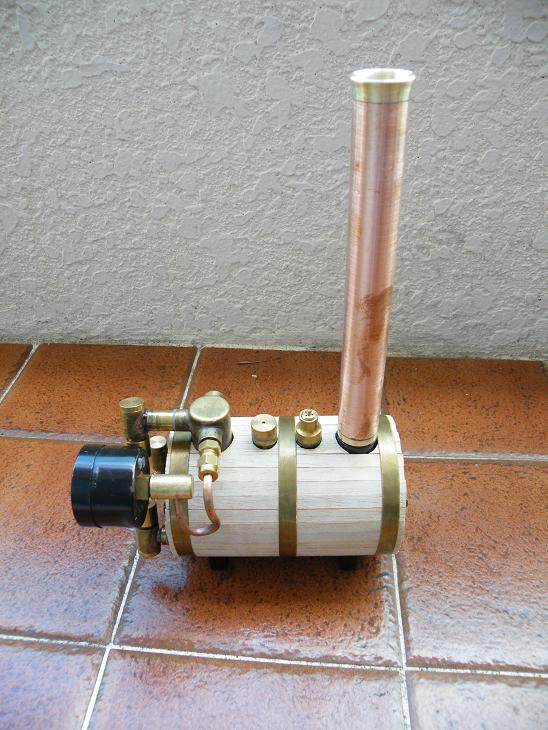
Made the lagging for the boiler. Use balsa wood, I had some and it was the right thickness. Its easy to cut, so could cut the holes of the fitting easily. I do not know if the heat will effect or burn the balsa wood, have to wait and see.
19 September 2010. Painted the boiler with black enamel paint, not sure if the paint will survive the heat of the boiler.
22 September 2010. Made the straps for the boiler. Had to cut one more strap as one melted during brazing the loop. The design for the straps had the nut taped 2mm, but I did not have 2mm bolts, so changed the design to 3mm bolts.
The flue brass ring to connect to the boiler was loose. Was thinking of putting 3 bolts into the boiler flue to hold the flue, but decided against it, as as it would be difficult to take down if need for packing for transport or storing. So extended the ring side that fits into the boiler by brazing a copper extender onto the ring. Had the extension brazed on, then the ring was loose in the flue. So decided to braze the flue onto the brass ring and extender.
24 September 2010. Brazed the brass ring and top to the flue. The braze ran a bit, so had to polish it to remove the excess braze.
Then went to make the pressure gauge pipe. I discovered that the 4mm pipe fitting was fitting the M8 threads in the steam dome. So that was a bonus. So annealed the copper pipe and filled it with grit, to prevent the pipe from kinking during bending. So got the pipe bended. I had intended to use the small pressure gauge. So brazed the pressure gauge connector onto the pipe, but the braze ran and the nut was brazed. So tried to undo the braze, but the union broke. So decided to use the other larger gauge. So had to make a connector for the larger gauge. Just a brass bar taped to suit the pressure gauge threads.
So now have the boiler basically finished. Just need to clean the brass fitting better.